Starting before dawn on Saturday morning, and ending after dark on Sunday evening, I was away from home at our Raccoon Creek Community site with our surveyor and his assistant surveying most of our property. The two of us who carried the "sticks" probably each walked about 10 miles, up and down, up and down, ...
The finished product of the survey will be a topographic map of the site with 1-foot contours. Currently, the best topo we have is the USGS 10-foot contours. That only gives a rough idea of the site, not enough detail to plan any building locations, roads or ponds and water catchment locations.
We did not survey the entire site, partly because there is a "tail" section that we aren't likely to "develop" to the extent that a 1-foot topo is needed, and partly because we wanted to take all the "shots" within two days.
The process was very instructive. Modern surveying equipment makes the job way different from when I played surveyor as a kid with a scope and a friend with a marked stick. The primary piece of equipment, the transit or theodolite, is a complex box about the size of a few bricks. It calculates direction, angle of elevation above or below, and, using infrared beams, the distance to the "stick" to within thousandths of a foot.
The "stick" is an extendable pole with a point on the top and bottom with a very precise circular mirror at a fixed height. Markings on the inside pole tell one how far from the ground the point is. These mirrors are remarkable. They are actually made of six mirrors that each are precisely 60 degrees of the circle. These are precisely set in a concave six-sided pyramid so that no matter from which direction one looks into the assembly, one sees the same picture of oneself. Move up or down, left or right, and one still sees the same part of one's face. This is very important, of course, because the mirror needs to precisely bounce the infrared beams back to the transit, and the stick holders cannot possibly get a precise 90 degree angle on the transit from sometimes hundreds of feet away.
So the process is to set up the transit on a point and take "shots" of the sticks at various points within sight of the transit. Each of these sightings are stored in a computer as data points. When all the points that can be shot from the transit are taken, the transit is moved to another point. A stick is placed where the transit was, and a shot is taken from the new point back to the previous point to verify their relationship to one another.
This process continues across the entire site, setting transit points by "backshooting" to earlier ones, and taking shots in every direction from each transit point. The more shots, the more precise the end product will be.
The trick is to take enough shots to get all the contour changes so the computer, where all the data points are processed, can place the data points on the map and interpolate between them to describe the contour lines. To get the best detail one must take shots on the center line, the "center of flow", of each stream, and the "toe" and "top of bank" on both sides. These five shots are taken at points along each stream where the route or the elevation changes. Shots are taken where there are changes in the slope, and also at scattered points across the entire area.
Again, the more shots, the better the product, but, obviously, there's a point beyond which the cost would outweigh the value of the extra precision. With two days to take the data points, we had to decide where to spend more time to get more shots and more detail, and where more detail wouldn't be all that useful, and, consequently, we could take fewer shots and still get what we need.
Within a week we should see the result of our work.
Monday, December 05, 2005


Thursday, November 24, 2005
Working with Ball State
On Monday, November 14, students from two graduate classes at Ball State visited Raccoon Creek in preparation for a short planning project. With them and two faculty members we walked much of the community site. Questions were asked and answered, lots of notes were taken, and the students saw most of the site and its possibilities.
Over the next few days a few phone calls were exchanged and the two classes, one in landscape architecture and one in architecture, worked on their respective assignments.
Finally, on Monday the 21st, a mere seven days after their site visit, the classes presented their plans to us at Ball State.
Unlike the class project last year, this year's group worked their proposals as a group and gave a single group presentation. (Last year each student proposed a complete site plan of their own.) This year's format worked better, I think, because, with only one proposal to create, there was no redundancy in various proposals. Students were able to discuss their ideas as a class, with the class choosing the best of them for inclusion.
Ideas that were especially interesting include:
Since it is likely that the community building will not be built for at least five years, one issue that was discussed was using the barn for more of the community purposes. This means designing the barn with more thought for larger group meals and perhaps moving a few "barn" things, like equipment storage, to a separate building.
This was all good food for thought.
We hope our relationship with Ball State faculty continues as Raccoon Creek Community grows over the years. Having a nice place for overnight class visits is one reason we are planning for dorm rooms in the barn.
Over the next few days a few phone calls were exchanged and the two classes, one in landscape architecture and one in architecture, worked on their respective assignments.
Finally, on Monday the 21st, a mere seven days after their site visit, the classes presented their plans to us at Ball State.
Unlike the class project last year, this year's group worked their proposals as a group and gave a single group presentation. (Last year each student proposed a complete site plan of their own.) This year's format worked better, I think, because, with only one proposal to create, there was no redundancy in various proposals. Students were able to discuss their ideas as a class, with the class choosing the best of them for inclusion.
Ideas that were especially interesting include:
- adding a large area attached to the barn in which the stairways would be located,
- infilling the barn walls with straw bales with at least one of the walls covered on the outside with transparent panels to show the bales,
- creating sets of water catchment areas to hold rain water on the hillside above the comunity area allowing it to be used for irrigation,
- moving some of the commuity activites to the third floor of the barn; and,
- building a boardwalk across the wetland area to protect it and allow more reliable access regardless of the weather.
Since it is likely that the community building will not be built for at least five years, one issue that was discussed was using the barn for more of the community purposes. This means designing the barn with more thought for larger group meals and perhaps moving a few "barn" things, like equipment storage, to a separate building.
This was all good food for thought.
We hope our relationship with Ball State faculty continues as Raccoon Creek Community grows over the years. Having a nice place for overnight class visits is one reason we are planning for dorm rooms in the barn.
Monday, October 31, 2005
We're half way there
Half way to our Permaculture Design Certificates that is.
A small but fiesty group of would-be (make that "will-be") permaculturists has completed the first half of the curriculum for permaculture design certification. Starting on October 21st and ending on the 29th we spent 8 days at the retreat center learning many aspects of permaculture. We also visited Raccoon Creek twice.
On the first visit the whole class created a swale on a steep hill on the edge of the property and planted a cherry tree. A swale is a trench that (usually) follows the contour of a hill. Its purpose is to trap water running downhill and hold it while it seeps into the hillside rather than running quickly off the hill and likely taking some top soil with it.
The soil removed from the trench is piled on the downhill side so the trench will hold more of the runoff. Over the next hours or days after a rain fall or as a result of snow melt, the captured water will seep into the ground below the swale. Gravity will cause the water to move under the swale and downhill. Over time, the soil below and downhill from the swale will retain much of the moisture making the hillside much better at supporting vegetation.
The cherry tree was planted on the downhill side of the swale. The swale was dug a bit deeper at the tree to catch a bit more water. We also nearly covered the small tree with brush to protect it from browsers, namely deer.
On our second visit, three of us took a close look at the strip of land next to the power line which is Raccoon Creek Community's west boundary. There is a fifty foot easement on each side of the property line demarked by a barbed wire fence and the power line runs above it.
We walked the length of it and found parts of the hill too steep to use, the wetland area ripe for developing, multiple eroded areas where a well pastured field drains across the easement into our woods, and a serious erosion problem at the creek on the southern end.
The entire plan had to be developed in about 3 hours, including the tour, travel each way, and drawing up the plan. Obviously, more detail would be needed later, but we took to the assignment enthusiastically. Here are our recommendations:
For the hillside: a few more swales and eventually a few terraces on the steepest side, the west. As the swales are dug, trees and companion plants would be placed along and between them. Further, we should make the tree line crenulated, that is, rippled, uneven, winding, so that more edge is created between the mowed and the untouched areas.
For the wetland: creation of chanampas -fingers of gardens protruding into a water body that are raised above the water using the soil removed from the wetland. Each of the "fingers" would have a path through the middle to allow for planting and harvesting. Along the width of the wetland area, their number would determine their width, or vice versa, and whether the path through each would be simple and straight or connect a series of "keyholes" that would enlarge the reachable area on each peninsula.
For the eroded areas: begin to slow the erosion by filling in the young gullies with fallen wood, rocks, whatever is nearby. Over time, water flow from the uphill neighbor's pasture will cause nature to fill in around the debris and make the edge along the trees more smooth. This will slow the runoff and cause it to flow into the woods along a longer edge.
For the creek bank: first, raise a ten foot long area at the base of the hill about three feet to cause the runoff to flow through the woods rather than straight into the creek. Next, plant the existing bank with whatever plants will best hold the remaining soil and absorbe the remaining flow.
Finally, along the entire length of the right-of-way we would define a path for walking and make sure it is built as necessary so it will not cause erosion on its own.
Our instructors added a few suggestions. Most significant of these was to take out a few more trees to create some micro climates along the wood's edge and to add some smaller plants along the tree line, if possible, (need to negotiate with the power company) to soften the edge between the mowed right-of-way and the treeline. The power company has trimmed the trees at almost exactly 50 feet from the center line, from the bottom of the tree all the way to the very top! They did not even make healthy cuts, with branches lopped off at fifty feet regardless of how much branch was left protruding from the tree. We hope we can take responsibility for maintenance of the right-of-way in the future.
These poor cuts should be repaired by cutting all the way back to the trunk of each tree, at least as far up the trees as we can get without the large equipment the power company uses.
(A few pictures coming soon.)
A small but fiesty group of would-be (make that "will-be") permaculturists has completed the first half of the curriculum for permaculture design certification. Starting on October 21st and ending on the 29th we spent 8 days at the retreat center learning many aspects of permaculture. We also visited Raccoon Creek twice.
On the first visit the whole class created a swale on a steep hill on the edge of the property and planted a cherry tree. A swale is a trench that (usually) follows the contour of a hill. Its purpose is to trap water running downhill and hold it while it seeps into the hillside rather than running quickly off the hill and likely taking some top soil with it.
The soil removed from the trench is piled on the downhill side so the trench will hold more of the runoff. Over the next hours or days after a rain fall or as a result of snow melt, the captured water will seep into the ground below the swale. Gravity will cause the water to move under the swale and downhill. Over time, the soil below and downhill from the swale will retain much of the moisture making the hillside much better at supporting vegetation.
The cherry tree was planted on the downhill side of the swale. The swale was dug a bit deeper at the tree to catch a bit more water. We also nearly covered the small tree with brush to protect it from browsers, namely deer.
On our second visit, three of us took a close look at the strip of land next to the power line which is Raccoon Creek Community's west boundary. There is a fifty foot easement on each side of the property line demarked by a barbed wire fence and the power line runs above it.
The assigment: How can the power line easement best be used? Develop a plan for improving the land and making it as productive as it can be.
We walked the length of it and found parts of the hill too steep to use, the wetland area ripe for developing, multiple eroded areas where a well pastured field drains across the easement into our woods, and a serious erosion problem at the creek on the southern end.
The entire plan had to be developed in about 3 hours, including the tour, travel each way, and drawing up the plan. Obviously, more detail would be needed later, but we took to the assignment enthusiastically. Here are our recommendations:
For the hillside: a few more swales and eventually a few terraces on the steepest side, the west. As the swales are dug, trees and companion plants would be placed along and between them. Further, we should make the tree line crenulated, that is, rippled, uneven, winding, so that more edge is created between the mowed and the untouched areas.
For the wetland: creation of chanampas -fingers of gardens protruding into a water body that are raised above the water using the soil removed from the wetland. Each of the "fingers" would have a path through the middle to allow for planting and harvesting. Along the width of the wetland area, their number would determine their width, or vice versa, and whether the path through each would be simple and straight or connect a series of "keyholes" that would enlarge the reachable area on each peninsula.
For the eroded areas: begin to slow the erosion by filling in the young gullies with fallen wood, rocks, whatever is nearby. Over time, water flow from the uphill neighbor's pasture will cause nature to fill in around the debris and make the edge along the trees more smooth. This will slow the runoff and cause it to flow into the woods along a longer edge.
For the creek bank: first, raise a ten foot long area at the base of the hill about three feet to cause the runoff to flow through the woods rather than straight into the creek. Next, plant the existing bank with whatever plants will best hold the remaining soil and absorbe the remaining flow.
Finally, along the entire length of the right-of-way we would define a path for walking and make sure it is built as necessary so it will not cause erosion on its own.
Our instructors added a few suggestions. Most significant of these was to take out a few more trees to create some micro climates along the wood's edge and to add some smaller plants along the tree line, if possible, (need to negotiate with the power company) to soften the edge between the mowed right-of-way and the treeline. The power company has trimmed the trees at almost exactly 50 feet from the center line, from the bottom of the tree all the way to the very top! They did not even make healthy cuts, with branches lopped off at fifty feet regardless of how much branch was left protruding from the tree. We hope we can take responsibility for maintenance of the right-of-way in the future.
These poor cuts should be repaired by cutting all the way back to the trunk of each tree, at least as far up the trees as we can get without the large equipment the power company uses.
(A few pictures coming soon.)
Tuesday, October 04, 2005
Unloading and stacking wood

Here are a few pictures from the work day on Sunday. It wasn't a particularly exciting effort, but we had to get the barn parts under cover and protected for the winter.
Five members, two volunteers, three who came with the truck and trailer, and one very small person were on site to help unload the trailer. The truck bed lifts, so it unloaded itself, though we had to stack all the beams that were on it and some from an earlier load more neatly.

A few critters showed up to watch us work. This praying mantis is the first I've seen on the site. It has already turned a bit brown and would have been invisible if it had stayed on the meadow grasses. It was actually larger than it appears here - about six inches long.
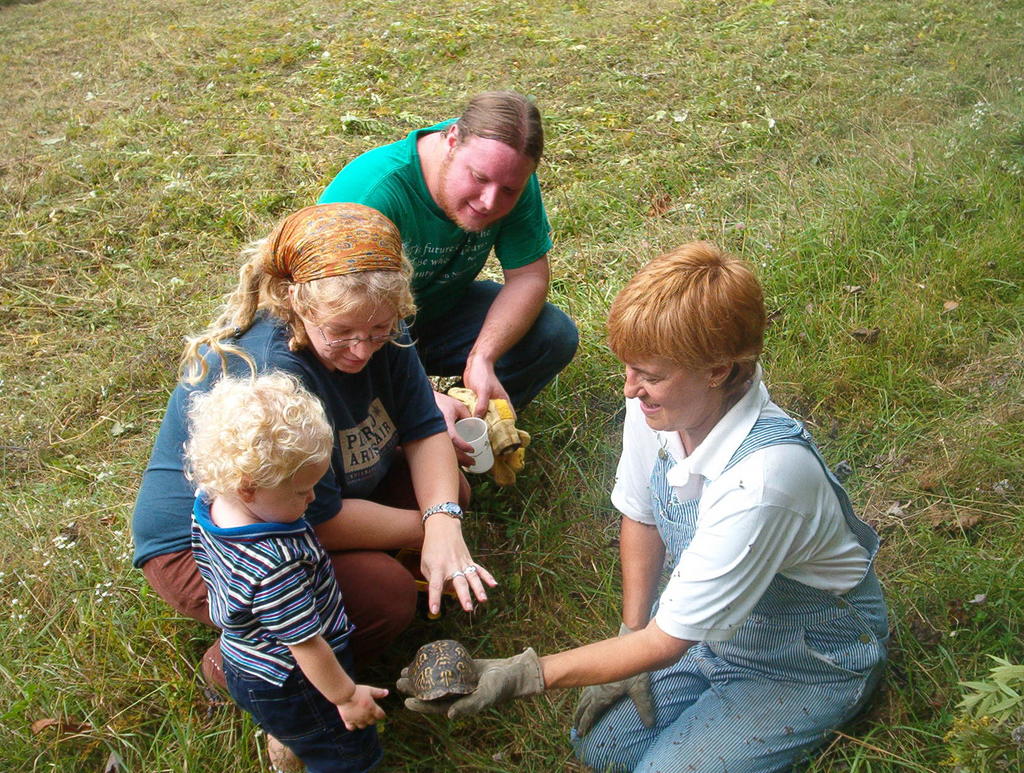 This box turtle is typical of many found at Raccoon Creek. It is probably the first that our youngest helper has ever seen. I'm amazed they can make headway through the tall meadow plants.
We still could benefit by consolidating some of our wood stacks and moving one or two a bit further from the center of the clearing. Maybe when it cools off a bit. It's not supposed to be in the high 80's in October.
Friday, September 30, 2005
It's all down

It's been a long summer. After nearly 20 working visits to the barn site, and a few trips to Raccoon Creek to prepare for and unload wood from the trucks, it is all down to the ground.
On Tuesday we arrived at the site with a crew of two experienced in taking down barns and an enormous crane that could be raised to about 90 feet and its operator.
The crane was able to lift small and large sections from any part of the barn, all from the same spot. (Remember, the barn was 60 by 54 feet.) It had a "basket" that could lift two men to anywhere on the barn and provided ample space to work without getting in each others' way.
It was interesting to see a few of the crane's
 safety features. For example, if the hook was raised too high, before jamming in the top pulley, it lifted a weight, which took tension off a switch, which shut off the winch that lifted the hook. Also, if the weight on the hook and the angle of the crane together threatened to tilt the truck, the boom would stop until more cable was played out and it was lifted higher to reduce the angular force, or until some weight was removed.
The process was to lift us to a spot, attach a strong strap to one or more barn parts, remove the pins and nails, loosen the part as best we could, then set the basket down to let us out, attach the strap to the crane's hook, and lift the piece or section off the barn and place it on the ground where we could disassemble it.
Sometimes the lift was a single piece, like one of the stringers attaching two posts together longways at the top of the barn.
 Other lifts were two to eight posts and beams that were tightly connected and more easily came down as one unit. There might even be a few knee braces included in the unit.
One mistake we made was not being careful to lay the units down the "right way," meaning with the correct side up to allow us to knock pins out from the top as the sections lay on the ground. We set many of the units down the "wrong way" and lost lots of time later taking them apart.
For each connection, we first tried to pound out the pin and "wiggle" the smaller part's tenon out of the mortise in the larger part. This wiggling wasn't as simple as it sounds. Many of the connections were still very tight after 140 years. We use a long 4X4 to pry and push the beam left and right as someone else inserted a wrecking bar, rock, wedge or board into the crack between the parts. At each change of direction, the crack opened up more and the a larger wedge could be inserted until the beam finally disconnected. It took two people to lift a typical beam, so this wiggling process took some time. Sometimes we were able to pound the pieces apart, but not often.
If knocking out the pin proved impossible, because it was too tight, had bent or broken inside the connection over the years, or the connection was wrong side up, we used a drill to core the pin holding the tenon in the mortise before using the "wiggle method" described above to separate the parts. Often the drill left what can best be described as a wooden straw inside the hole because the drill was just a tiny bit smaller than the pin or because the course of the drill missed part of the pin on the inside. In these cases we had to drill again (and sometimes again) to remove all the pin.
The last resort was to saw off the tenon. We tried to reserve this approach for beams with tenons that had already rotted away and would not be reusable. These beams will be used by attaching them to their posts with strong angular steel plates.
Some of the dismantling on the ground was done on Tuesday and Wednesday by two of us - enough for a truck load of beams. On Friday three of us worked nine hours and another for the last three to take apart every useful post, beam and knee brace. As it was getting too dark to work, the last pieces came apart and we loaded the generator to return it to the rental site.
 A very tired crew drove back north in the dark. When we left the site looked like a giant game of pick up sticks.
Our selective logging friend was to return on Saturday to load all the useful parts onto his large truck and a long trailer for transport to Raccoon Creek. On Sunday we will meet the trucks and stack all the wood better to protect it for the winter.
I'll post lots of barn pictures on the web site next week.
Wednesday, September 21, 2005
RaccoonCreekForum open discussion list announced
Due to numerous requests from folks who have been getting our announcements, a new email discussion list has been set up to allow people to ask questions, get answers and discuss Raccoon Creek's progress. Community members will also subscribe to the list so we can answer specific questions about Raccoon Creek.
Subscribers are encouraged to discuss issues related to Raccoon Creek, such as intentional community, green building, permaculture, rainwater harvesting, designing for solar power, etc.
Use the input box in the right column to subscribe to the new list named RaccoonCreekForum. Just enter your email address and click on the purple box.
Subscribers are encouraged to discuss issues related to Raccoon Creek, such as intentional community, green building, permaculture, rainwater harvesting, designing for solar power, etc.
Use the input box in the right column to subscribe to the new list named RaccoonCreekForum. Just enter your email address and click on the purple box.
Sunday, September 18, 2005
A fair day
We just returned from two days at the Simply Living Fair in Bloomington. We spent last night at Raccoon Creek rather than driving home to Indianapolis.
The number of visitors to the fair was down from other years, but the quality of attendees was as high as ever. Many of the participants in the various presentations were as informative as the knowledgeable presenters. There were sessions on homesteading, gardening, herbs, transportation, energy, 32 presentations in all, including a "Chickens in the City" field trip. (I wondered if this was about people afraid to visit the country, but I digress.)
We had a table for Raccoon Creek Community and handed out about a hundred of our new flyers. You can print one for yourself from our web site. Please share it with others.
We met many people who had heard of Raccoon Creek, and many who offered assistance of various sorts. One fellow has been a city planner for many years and offered ideas on working through the various planning stages. One has a landscaping business; at least two have horticulture backgrounds. One woman offered to help us get permission for a larger meeting space for our Bloomington meetings. And we got good advice from timber framers, green builders, and others who wished us well.
Perhaps most encouraging were the people who told me they have been reading this blog. I'll have to check my grammar and spelling better now that I know people are actually reading these posts.
And our new three dimensional map of the site was displayed. Made of cardboard layers cut to match the contour lines on the USGS topographic map for Raccoon Creek, the map was a big hit and made describing the property much easier.
The next meeting is in Bloomington on September 29th. More details will be sent to our "announcements list". If you'd like to be on it, let me know.
The number of visitors to the fair was down from other years, but the quality of attendees was as high as ever. Many of the participants in the various presentations were as informative as the knowledgeable presenters. There were sessions on homesteading, gardening, herbs, transportation, energy, 32 presentations in all, including a "Chickens in the City" field trip. (I wondered if this was about people afraid to visit the country, but I digress.)
We had a table for Raccoon Creek Community and handed out about a hundred of our new flyers. You can print one for yourself from our web site. Please share it with others.
We met many people who had heard of Raccoon Creek, and many who offered assistance of various sorts. One fellow has been a city planner for many years and offered ideas on working through the various planning stages. One has a landscaping business; at least two have horticulture backgrounds. One woman offered to help us get permission for a larger meeting space for our Bloomington meetings. And we got good advice from timber framers, green builders, and others who wished us well.
Perhaps most encouraging were the people who told me they have been reading this blog. I'll have to check my grammar and spelling better now that I know people are actually reading these posts.
And our new three dimensional map of the site was displayed. Made of cardboard layers cut to match the contour lines on the USGS topographic map for Raccoon Creek, the map was a big hit and made describing the property much easier.
The next meeting is in Bloomington on September 29th. More details will be sent to our "announcements list". If you'd like to be on it, let me know.
Monday, September 12, 2005
Best laid plans
I returned last night from a week out of town all fired up to head down to the barn tonight to get ready to take it down starting tomorrow. This morning when I called the fellow who is running the show for us on this step I learned that the operator of the large piece of equipment that we will use was on vacation! Why we didn't know this before this week was scheduled I cannot say, but the fact is we cannot start until Spetember 27th, two weeks from now.
Some of our community went to the barn site on Saturday and moved another large load of wood to Raccoon Creek. The truck owner tagged a few more trees that need to be taken down to allow the larger trailer to get onto the site, so we will spend a day or so between now and the 28th doing a bit more widening.
This weekend we will be manning a table at Bloomington's Simply Living Fair. If you've got an interest in simplifying your life, this fair is a great place to learn how. Visit our table if you can attend, and plan to have dinner with us on Saturday and/or Sunday evening to talk about Raccoon Creek and our upcoming permaculture course. (Discount deadline is the 21st of September.)
The following weekend may be the best time to restack the barn wood that has already been taken to the site. It should be a great time of year to spend a day at Raccoon Creek, or even to camp overnight. Let us know if you'd like to help for a few hours that weekend.
Some of our community went to the barn site on Saturday and moved another large load of wood to Raccoon Creek. The truck owner tagged a few more trees that need to be taken down to allow the larger trailer to get onto the site, so we will spend a day or so between now and the 28th doing a bit more widening.
This weekend we will be manning a table at Bloomington's Simply Living Fair. If you've got an interest in simplifying your life, this fair is a great place to learn how. Visit our table if you can attend, and plan to have dinner with us on Saturday and/or Sunday evening to talk about Raccoon Creek and our upcoming permaculture course. (Discount deadline is the 21st of September.)
The following weekend may be the best time to restack the barn wood that has already been taken to the site. It should be a great time of year to spend a day at Raccoon Creek, or even to camp overnight. Let us know if you'd like to help for a few hours that weekend.
Wednesday, September 07, 2005
Last post before there are no more posts
I hope there will only be a few more entries before the entire barn in New Albany is dismantled and moved to Raccoon Creek.
Last weekend we removed all the nails in all remaining wood that has been taken off the building. All the board were stacked in preparation for transporting them to Raccoon Creek, and a large load of rafters and purlins was moved and slid off the truck in the larger clearing.
Help is needed this weekend to load the truck another time and to stack and cover the wood in the clearing. Loading should take less than a few hours on Saturday, faster with more help. Stacking and covering the load in the field on Sunday will take less than an hour. Please let us know if you can help on either end. I am away until Sunday evening, but you can contact me by email with your phone number and I will pass on your offer to the person coordinating the move.
The next work will begin on Tuesday the 13th when help arrives in the form of a few experienced people and some heavy equipment to allow us to take the beams and posts down. If all goes well the timbers will all be on a large trailer in two days, or maybe three.
Once the trailer pulls away, we'll likely need to return to the barn site for a day to do some final cleanup and remove some trash.
It will be nice to be able to concentrate our energy on the Raccoon Creek site after that. I bet you might be tired of reading about the barn, too.
Sunday, August 28, 2005
The roof is gone!
With the help of a rented lift platform, yesterday and today we took down all the rest of the purlins (3/4s of the roof area) and all 124 rafters! What a hoot!
Using the lift, one person rode to the top of the inside of the barn while another climbed the purlins on the lower pitch of the roof's west side. (The upper pitch purlins were removed weeks ago.) Each pried off one end of each rafter and the "lower" person slide his end aside until it fell off the header and dropped to the ground. This was repeated until all the rafters in a bay were dislodged and dropped.
Then the lift was lowered, moved to the next bay, and raised to the top again. The process was repeated, dropping about 6 rafters for each move of the lift, until the whole west side top pitch was removed.
Then the purlins on the east side top were removed so the rafters could be taken down next. On this side the lift was even more helpful. As each bay of rafters was dislodged at the bottom by the person standing on the lower east side purlins, the lift was used to lift them off the bottom while they were still attached to the top header. This made it a simple task to push the wrecking bar under each rafter, unlike the rafters on the other three pitches, most of which were tightly nailed down and took considerable effort to pry them off. Then, as each rafter was pried off at the top, the lift rider hung onto it while he hung up his wrecking bar, and pushed the rafter down over the hip of the roof and gave it a push. Each rafter slid down the lower pitch and landed on the east side of the barn.
Next the lower east side purlins came off, the bottom four or five rows being removed from the list platform, now on the east outside of the building. Using the lift saved probably 3/4ths of the time for these last rows which otherwise would have had to be removed while standing on a ladder, and climbing down to move the ladder every 6 rafters or so.
On this pitch of rafters, from the lift platform, we pried the lower end up and swung it left or right until it cleared the header it had been nailed to. Then it was dropped just as the top pitch of the west side had been dropped, only not so far.
Finally the lower west side purlins and rafters were removed in the same way as the lower east side.
The bad news: many of the rafters broke when they fell. Many were already cracked, especially at the notches. In some cases the length below the bottom pitch notches - the roof overhang - was already disconnected from the rest of the rafter. Only the purlins, attached to adjacent rafters, had been holding these rafter fragments. Obviously, if the roof is rebuilt like it was, the rafters that are broken or damaged cannot be used.
The good news: All but a handful of the damaged rafters will make great joists for the lofts that had no flooring to begin with.
Next: take out nails, stack and load and transport to Raccoon Creek, take down, load and transport posts, beams and knee braces to Raccoon Creek.
Using the lift, one person rode to the top of the inside of the barn while another climbed the purlins on the lower pitch of the roof's west side. (The upper pitch purlins were removed weeks ago.) Each pried off one end of each rafter and the "lower" person slide his end aside until it fell off the header and dropped to the ground. This was repeated until all the rafters in a bay were dislodged and dropped.
Then the lift was lowered, moved to the next bay, and raised to the top again. The process was repeated, dropping about 6 rafters for each move of the lift, until the whole west side top pitch was removed.
Then the purlins on the east side top were removed so the rafters could be taken down next. On this side the lift was even more helpful. As each bay of rafters was dislodged at the bottom by the person standing on the lower east side purlins, the lift was used to lift them off the bottom while they were still attached to the top header. This made it a simple task to push the wrecking bar under each rafter, unlike the rafters on the other three pitches, most of which were tightly nailed down and took considerable effort to pry them off. Then, as each rafter was pried off at the top, the lift rider hung onto it while he hung up his wrecking bar, and pushed the rafter down over the hip of the roof and gave it a push. Each rafter slid down the lower pitch and landed on the east side of the barn.
Next the lower east side purlins came off, the bottom four or five rows being removed from the list platform, now on the east outside of the building. Using the lift saved probably 3/4ths of the time for these last rows which otherwise would have had to be removed while standing on a ladder, and climbing down to move the ladder every 6 rafters or so.
On this pitch of rafters, from the lift platform, we pried the lower end up and swung it left or right until it cleared the header it had been nailed to. Then it was dropped just as the top pitch of the west side had been dropped, only not so far.
Finally the lower west side purlins and rafters were removed in the same way as the lower east side.
The bad news: many of the rafters broke when they fell. Many were already cracked, especially at the notches. In some cases the length below the bottom pitch notches - the roof overhang - was already disconnected from the rest of the rafter. Only the purlins, attached to adjacent rafters, had been holding these rafter fragments. Obviously, if the roof is rebuilt like it was, the rafters that are broken or damaged cannot be used.
The good news: All but a handful of the damaged rafters will make great joists for the lofts that had no flooring to begin with.
Next: take out nails, stack and load and transport to Raccoon Creek, take down, load and transport posts, beams and knee braces to Raccoon Creek.
Sunday, August 21, 2005
Barn history
One of the grandsons of a past owner of the property on which the barn we are dismantling stands, investigated and wrote the following history. Our thanks go to Don Smith for this contribution to our community history.
At the time of the 1859 map of Floyd County, the property at what is now 201 Hausfeldt Lane (Hossfeld) was owned by Peter Smeaton and his wife. As of 7-06-05, I have not been able to trace the ownership further back.
At the time of the 1859 map of Floyd County, the property at what is now 201 Hausfeldt Lane (Hossfeld) was owned by Peter Smeaton and his wife. As of 7-06-05, I have not been able to trace the ownership further back.
On September 24, 1860, the property (66 acres) was sold to Barbara and John G. Beck.
On May 21, 1866, the property was sold to Francis and Louis Fraaz.
On February 27, 1869, Francis H. Fraaz transferred half of the 66 acres to Jacob Vetterlin.
On December 6, 1870, Louis Fraaz and Anastatia, (his wife) and Jacob Vetterlin sold all 66 acres to William Geltmacher.
On November 28, 1872, William Geltmacher and Catherine (his wife) sold the property to Ignatius Ohlmann.
On December 18, 1878, Ignatius Ohlmann (marital status not shown) sold the property to Ernst Hossfeld, my great-grandfather, and the one for whom the road was named.
The farm came down through 4 generations of my family, with parts of the property being sold off at times until there was just under 5 acres remaining, this part containing the barn. This remaining property was sold to the present owner, Janet Burkhart, in September of 2004.
From what I was always told, 3/4 of the barn was existing when my ancestors bought the property in 1875. At that time, the "dog trot" or drive though was down the center of the barn and the barn had a gable roof. According to family lore, my great grandparents enlarged the barn by adding a series of bays to the west side, making the "dog trot" off center, and by splicing 2 sets of upright posts and raising the roof, they made the roof into the gambrel shape as is exists today.
In some publications, I've read, the barn was dated as going back to the 1860's and early 1870's. As there were a number of owners during that time period, it could have been erected by any of a number of persons.
My father ran the farm until the 1960s. After that the farm was sharecropped and the barn no longer used. A lot of the ground was sold in 1980 and the farm ceased operations; thus, the barn was not used except for storage since that time.
If anyone should stumble across any additional information about the barn, please contact us.
Saturday, August 20, 2005
Moving day
Well we finally bit the bullet and rented a van for two days to move most of the wood and roofing we have removed from the barn to Raccoon Creek. It took a total of 24 man-hours to fill the van twice, Friday and today. It took 6 man hours to unload and stack siding and other wood this morning, and will probably take about 3 hours each for two of us to unload in the morning tomorrow. That doesn't include the 20 hours total for two and then three of us to make the 4 hour round trip.
Truck rental was an expense I had hoped to keep to a minimum. The going rate for mileage charges for trucks here is $.79/mile! By the time we take it back tomorrow we will have put almost exactly 400 miles on it, and I was so sure we could find a truck to borrow.
We stacked the "good stuff" this morning before heading back to the barn site for another load. Tomorrow we plan to just dump everything off and try to get the truck back before the established return time. I hope we have enough time to cover all the piles with tin roofing. There's plenty of roofing, but I'm not sure there will be plenty of time.
We'll have to get some folks down to the site over the next few weeks to get the lumber sorted and stacked neatly. Otherwise, when we need it in the spring, we'll spend too much time searching for what we need.
Left to do at the barn site:
Remove remaining purlins and rafters.
Take down all posts and beams.
Truck posts and beams to Raccoon Creek
Truck rental was an expense I had hoped to keep to a minimum. The going rate for mileage charges for trucks here is $.79/mile! By the time we take it back tomorrow we will have put almost exactly 400 miles on it, and I was so sure we could find a truck to borrow.
We stacked the "good stuff" this morning before heading back to the barn site for another load. Tomorrow we plan to just dump everything off and try to get the truck back before the established return time. I hope we have enough time to cover all the piles with tin roofing. There's plenty of roofing, but I'm not sure there will be plenty of time.
We'll have to get some folks down to the site over the next few weeks to get the lumber sorted and stacked neatly. Otherwise, when we need it in the spring, we'll spend too much time searching for what we need.
Left to do at the barn site:
Remove remaining purlins and rafters.
Take down all posts and beams.
Truck posts and beams to Raccoon Creek
Monday, August 15, 2005
everyday matters
Recently the Sierra Club added a new feature to its web site named "everyday matters." Club members across America were invited to submit a short article telling what they were up to on the same Saturday in August. If you're interested, here's the entry I sent. You also can read some of the nearly 200 others.
Saturday, August 13, 2005
Permaculture Course details - Web site
Web site
Due to a gift of DSL service for my birthday and the pending loss of my old web site that came with the soon-to-be-defunct email address, I have finally made the effort to set up a simple web site for the Raccoon Creek Community.
Our new web address is http://a.domaindlx.com/RaccoonCreek/.
It's not fancy but it should be an easier way for one to find information about us without having to scrool through "Up the Creek..." and its various monthly archives.
Over time I'll try to expand the web site to include more pictures and specific information. If there is specific information that you'd like to see there, let me know.
Permaculture Course Announcement flyer
For now, the web site's prime purpose is to provide a home for the "Permaculture Course Announcement flyer."
It would be great if you would distribute the announcemnt to anyone who might be interested. Note especially the discount offered for registration by September 21st, a month before the start of the course. Campers can save another $50.
Tuesday, July 26, 2005
65760
That's the ZIP code for Tecumseh, Missouri.
"Yeh, so what?" you ask.
Tecumseh happens to be the community closest to East Wind, an intentional community in the Ozarks that was started in 1973 and has 75 residents today.
"And?"
And East Wind is the subject of an article starting on page 114 of the new August 2005 National Geographic magazine.
"OK, so why are you telling us?"
I mention it in an attempt to preempt someone from walking up to me to with a smirk to say, "I saw your 'commune' in National Geographic." Though Raccoon Creek Community will have some property owned in common, it is not a commune, and we will not be shared clothing, nor partners.
See "Eco-village?", "How's your commune coming?", and "A community by any other name - definitions" for a brief explanation of community terms as I understand and use them in this blog.
The article is brief but interesting. The nice folks at East Wind are doing their thing, their community has evolved over 32 years into what they have decided it should be, and it appears to be an interesting place to visit.
The article describes some of the rules and methods they use to manage their community and run their successful nut butter business. I'm sure there are things we can learn from them, and probably some things we can't.
"Yeh, so what?" you ask.
Tecumseh happens to be the community closest to East Wind, an intentional community in the Ozarks that was started in 1973 and has 75 residents today.
"And?"
And East Wind is the subject of an article starting on page 114 of the new August 2005 National Geographic magazine.
"OK, so why are you telling us?"
I mention it in an attempt to preempt someone from walking up to me to with a smirk to say, "I saw your 'commune' in National Geographic." Though Raccoon Creek Community will have some property owned in common, it is not a commune, and we will not be shared clothing, nor partners.
See "Eco-village?", "How's your commune coming?", and "A community by any other name - definitions" for a brief explanation of community terms as I understand and use them in this blog.
The article is brief but interesting. The nice folks at East Wind are doing their thing, their community has evolved over 32 years into what they have decided it should be, and it appears to be an interesting place to visit.
The article describes some of the rules and methods they use to manage their community and run their successful nut butter business. I'm sure there are things we can learn from them, and probably some things we can't.
Subscribe to:
Posts (Atom)