Showing posts with label Timber framing. Show all posts

Tuesday, October 03, 2006

Two down, four to go


It's Monday evening and this picture doesn't do the sunset justice.

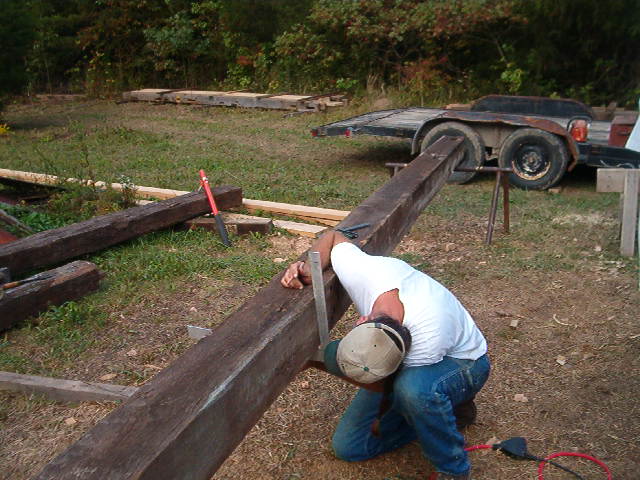
We completed the second of six bents today, and stacked them on the waiting pile. The outside posts and beams in the second and fifth bents are the easiest, meaning they have the fewest cuts to be made on them. The posts have just two housings for braces, and a single mortise for the beam. The beams have just two tenons. These two bents are a bit simpler than the rest. We are not putting knee braces on the beam so some of the outside bays will easier to use in tandem. On the outside bents that will have the knee braces, the bottoms of the braces will be at about 5 feet above the floor. We'll have to get used to their being there if they separate two bays that have no wall between them.

The outside bays will have mostly original timber posts from the old barn. Surprisingly, though they were on the outside walls of the old barn, more of them survived in a useable state than did interior posts. They are being cut shorter by about two feet which will make them lower than the main aisle. On the second floor this will mean taking two steps down from the main aisle to the outer bays.

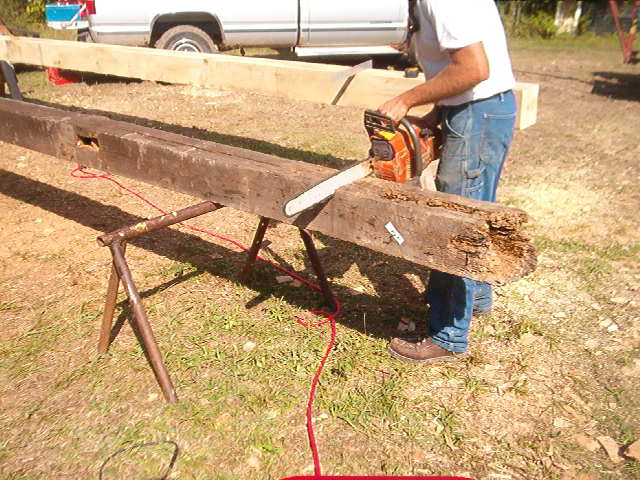
I'm learning timber framing, one task at a time. The dirtiest job is watching as someone cuts through a large timber end with a chainsaw to tell him where he is with respect to the line on the bottom he cannot see. Sawdust falls right in one's face so a face mask and glasses are essential.


The hardest task is moving some of the larger timbers. Most times this is done with the tractor, but when there is only one or two to move, it sometimes isn't worth starting and manuevering the tractor, so we lift them by hand. Some wood species are a lot heavier than others.

It's likely to be a short week due to rain and a trip planned by one of the timber framers that starts Wednesday. That will give me a chance to get some more work done on the house so we can sell it. I hope to post more pictures of the timber manufacturing process also.

Thursday, September 28, 2006

Timber framing 101 -Mortises


More than two feet of this post's rotted end had to be removed. A chainsaw is the fastest and generally most accurate way to do this.

Using a carpenters square, Jason marks the cuts for a mortise and its housing on one of the original posts. A mortise is a hole in the post or beam that accepts a tenon. The tenon is the extension of a beam or a knee brace that fits into a mortise. A housing is an inset in the post larger than the mortise itself. Most of the weight of a beam is actually transfered to the post through the housing shelf.

An electric mortiser, incorporating a small chainsaw, is used to rough cut the mortises.

Next, the bottom of the mortise is cleaned out using various chisels.

Then the housings are cut, first using a hand saw or circular saw, the wood is chiseled or chopped out, and finally the cut is "fine tuned" and a slight inward angle added to make the joint clean and tight when a beam is inserted. Dave is roughing out the wood with a chisel and a very large mallet.

What a month! - Work begins on the barn

Though there have been no posts to the blog in more than a month, it doesn't mean nothing has been happening.

We got bad news about the timbers we saved from the barn. Our timber framers, Red Tail Timberframes, LLC, evaluated all of them and found nearly two-thirds could not be used structurally in the new barn. Consequently we have to cut and mill many more timbers than we had planned. This has increased the cost of the barn, but there is an up side.

The original barn had four aisles, each 12 or 13 feet wide. Twelve-foot bays limit the uses of the barn. It also had extensions, about five feet long, at the top of twelve of the posts. This configuration would have made a third floor weaker and less useful.

Rather than cutting and manufacturing six more tall posts (24 feet each), our lead timber framer, Jason, proposed a new configuration for the barn to which we all quickly agreed.

The new barn will have only three aisles, but the main aisle will be 22 feet wide! This will allow us a single area that is 60 feet long and 22 feet wide, with a space of the same size possible on the second floor, and the third floor!, though the third floor will have lots less headroom.

So far about half of the needed trees have been cut, all of them already fallen, standing dead, or severely compromised with few years left to be standing. All of them have been milled using a portable Lucas Mill saw mill that was built in Australia.

Along with the timbers which I learned must be from the center of the log, we now have many hundreds of board feet of dimension lumber, including many that are longer than the main aisle is wide, and enough scrap to last years for crafts, fire wood or camp fires.

Thursday, July 20, 2006

Vacation's over: back to work

It's been a month and a half since the last posting. It doesn't seem that long since three weeks of it were spent in Europe. We had a great time and saw lots of things that will help at Raccoon Creek Community.

Since returning we have met with Red Tail Timber Frames owner and have agree to have them manage the reconstruction of our barn. They will begin in early August.

Missing posts and beams - parts that had rotted in the barn before we dismanteled it - will be replaced with timbers harvested from areas which will become ponds on the Raccoon Creek site. Red Tail will pull them from the woods using their draft horses, and mill them with their portable saw mill.

We have taken out a building permit for the barn, talked again with our REMC and gotten a quote from a well driller. Soon we will erect a tent or two and some screen tents so we can work at the site for a few days in a row without traveling back and forth so often.

If you've been wanting to visit the site, these next few weekends would be a great time. After that we should be very busy working on the barn.

Monday, December 05, 2005

A weekend of ups and downs

Starting before dawn on Saturday morning, and ending after dark on Sunday evening, I was away from home at our Raccoon Creek Community site with our surveyor and his assistant surveying most of our property. The two of us who carried the "sticks" probably each walked about 10 miles, up and down, up and down, ...

The finished product of the survey will be a topographic map of the site with 1-foot contours. Currently, the best topo we have is the USGS 10-foot contours. That only gives a rough idea of the site, not enough detail to plan any building locations, roads or ponds and water catchment locations.

We did not survey the entire site, partly because there is a "tail" section that we aren't likely to "develop" to the extent that a 1-foot topo is needed, and partly because we wanted to take all the "shots" within two days.

The process was very instructive. Modern surveying equipment makes the job way different from when I played surveyor as a kid with a scope and a friend with a marked stick. The primary piece of equipment, the transit or theodolite, is a complex box about the size of a few bricks. It calculates direction, angle of elevation above or below, and, using infrared beams, the distance to the "stick" to within thousandths of a foot.

The "stick" is an extendable pole with a point on the top and bottom with a very precise circular mirror at a fixed height. Markings on the inside pole tell one how far from the ground the point is. These mirrors are remarkable. They are actually made of six mirrors that each are precisely 60 degrees of the circle. These are precisely set in a concave six-sided pyramid so that no matter from which direction one looks into the assembly, one sees the same picture of oneself. Move up or down, left or right, and one still sees the same part of one's face. This is very important, of course, because the mirror needs to precisely bounce the infrared beams back to the transit, and the stick holders cannot possibly get a precise 90 degree angle on the transit from sometimes hundreds of feet away.

So the process is to set up the transit on a point and take "shots" of the sticks at various points within sight of the transit. Each of these sightings are stored in a computer as data points. When all the points that can be shot from the transit are taken, the transit is moved to another point. A stick is placed where the transit was, and a shot is taken from the new point back to the previous point to verify their relationship to one another.

This process continues across the entire site, setting transit points by "backshooting" to earlier ones, and taking shots in every direction from each transit point. The more shots, the more precise the end product will be.

The trick is to take enough shots to get all the contour changes so the computer, where all the data points are processed, can place the data points on the map and interpolate between them to describe the contour lines. To get the best detail one must take shots on the center line, the "center of flow", of each stream, and the "toe" and "top of bank" on both sides. These five shots are taken at points along each stream where the route or the elevation changes. Shots are taken where there are changes in the slope, and also at scattered points across the entire area.

Again, the more shots, the better the product, but, obviously, there's a point beyond which the cost would outweigh the value of the extra precision. With two days to take the data points, we had to decide where to spend more time to get more shots and more detail, and where more detail wouldn't be all that useful, and, consequently, we could take fewer shots and still get what we need.

Within a week we should see the result of our work.